Holiday parties with my family mean 3 things, lots of yummy food, lots of fun, and lots of crazy kids. This year I’m trying to get ahead of the game by having some simple activities on hand to keep them occupied while we get meals ready, or just visit as adults.
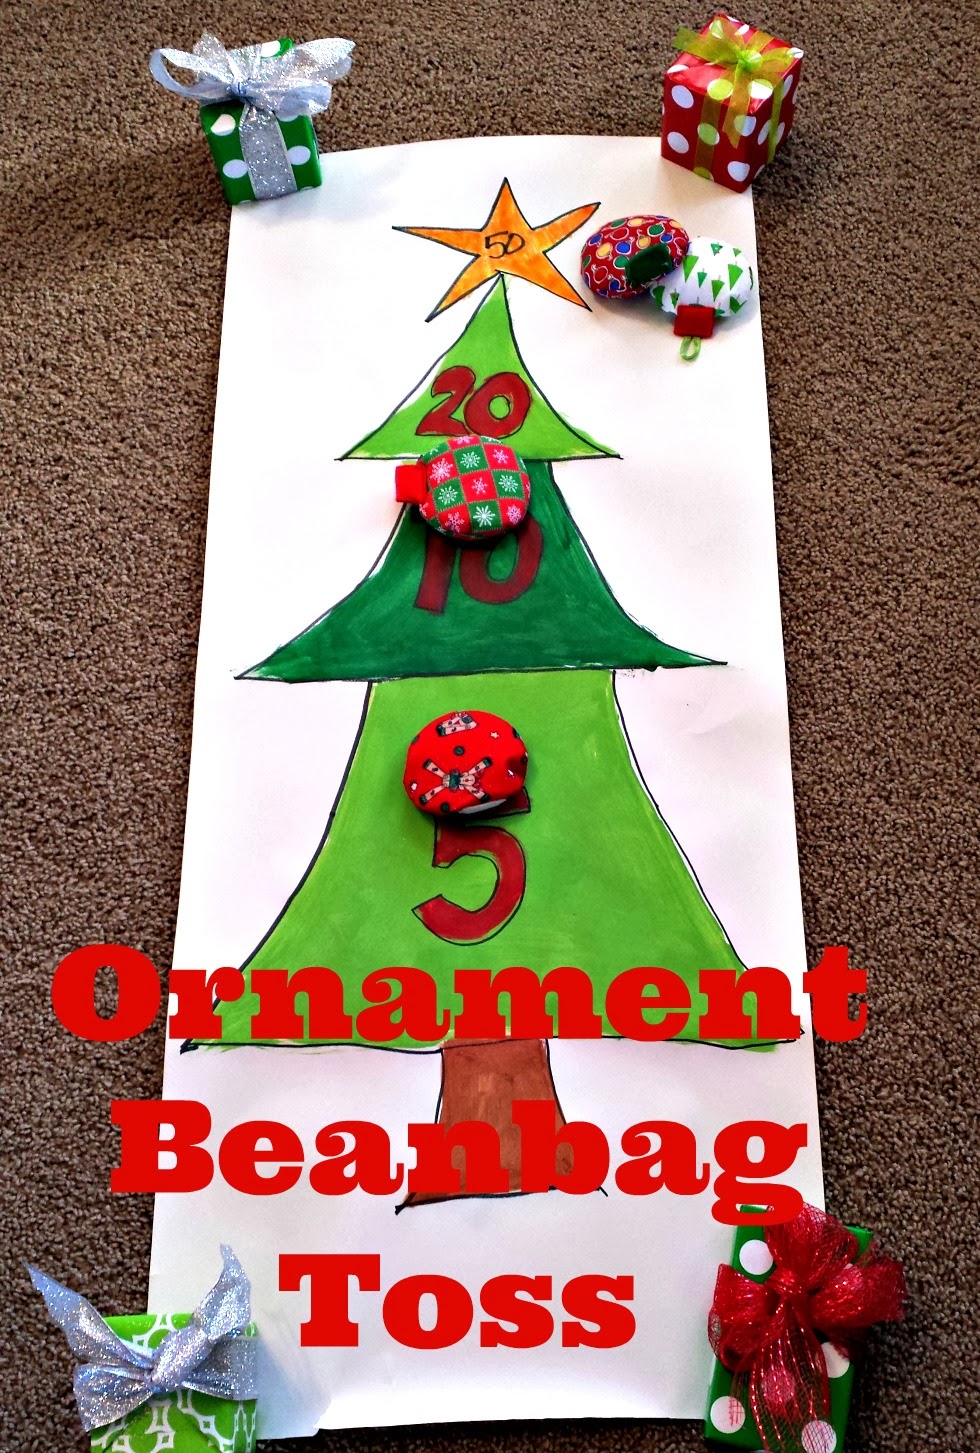
This Ornament Beanbag Toss can be made in one nap time and can be used over and over again. The kids can team up, or can try to beat their high score. There are lots of ways to play depending on the ages and interest of the kids.
Lets get our ornaments started.
- a large circle template. I used a canister lid
- a pen
- fabric scraps, large enough to make 2 circles
- felt scraps and a small piece of ribbon
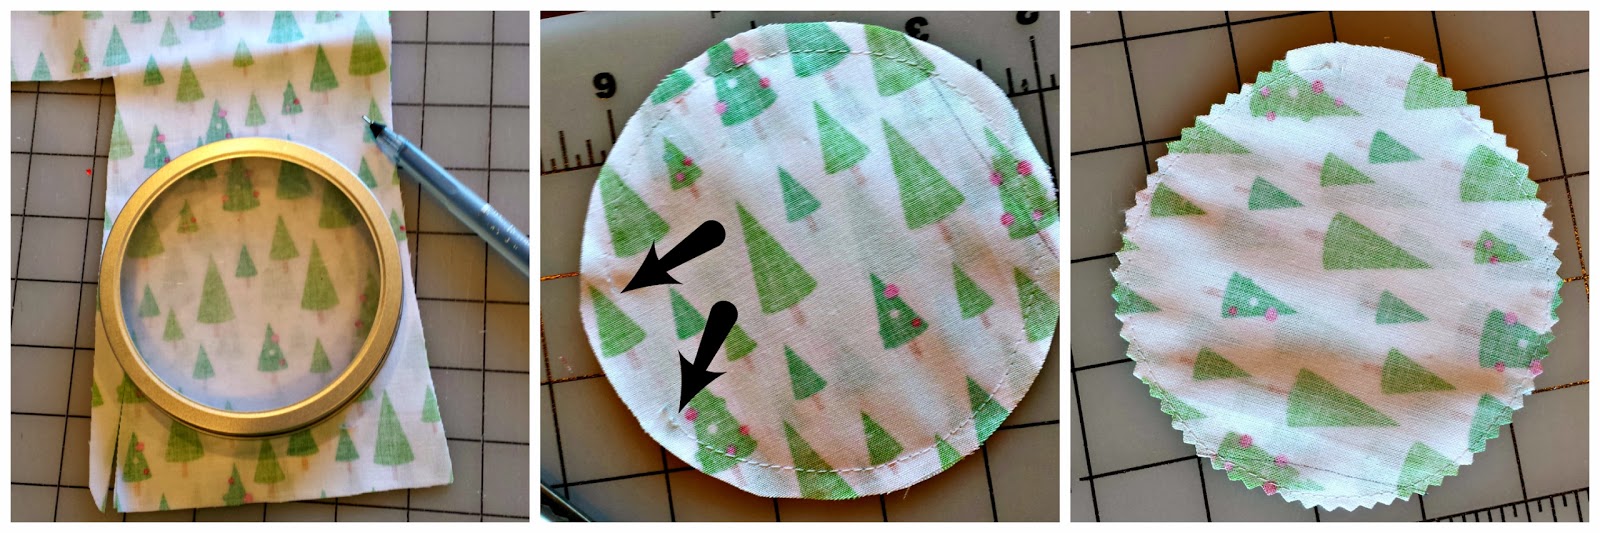
Fold your fabric over so the right sides are together. Trace your circle and cut it out. Sew around the circle using a 1/4″ seam allowance. Go slow here. Put your needle down every couple of stitches, lift the presser foot and turn the circle.
Leave a small opening for turning. Backstitch at the beginning and the end of your sewing. If your fabric is directional (meaning it has a pattern that only goes one way) you will want to make sure the opening is at the top of the ornament. (my picture shows the opening in the wrong place, the next collage has it placed correctly)
This is my trick for clipping seam allowances so circles lay flat. I use pinking shears. Just trim close to the sewn line, making sure you don’t clip the string. If you don’t have pinking shears, just cut notches into the seam allowance all around the circle to remove some of the excess fabric. Turn right side out.

Fill your ornament. A small piece of paper rolled into a funnel can help here. Use rice, beans or whatever you have on hand that will give the ornament some weight. Don’t overfill the ornament, you’ll want to leave it about 1/3 – 1/4 unfilled.
Push all the filling into the bottom of the ornament and place a pin through both layers of fabric just above the top of the filling to keep it at the bottom while you sew the topper on.
Cut two rectangles of felt. Mine were 1″ X 1 1/4 “.
Place one felt piece under the opening in the ornament.
Create a loop with the ribbon. Make sure the ends are both in the middle of the felt rectangle.
Match up the last felt rectangle on top with the bottom one. Make sure you have both ribbon ends and the entire opening of the ornament enclosed within the rectangles. Sew around the rectangles using a 1/8″ seam allowance.

Your ornament is done.
Now make up a few more. You can do two color schemes- like red and green for example- to allow for more options for game play. Or just make up 3-4 random patterns.
The last thing to do is make your game board.

For my game board I used some paper from a roll I bought at Ikea. You could use wrapping paper, poster board or any other base you’d like. I painted a tree with graduating sized sections and gave them increasing value based on their size. The paper started rolling up at the ends so I wrapped some blocks of wood with wrapping paper to use at weights to hold the corners down.
The basic game would involve the kids standing behind a pre-determined line and tossing the ornaments on the tree. Scores would be kept and the highest score would win.
One alternative would be to have two teams and alternate tosses. If an opponent’s bag lands on the same section as the player the scores are offset. Knocking bags off the board would be allowed and the team with the highest score after a certain number of rounds would win. Or you could play the first team to a predetermined score would win.
The options are endless. And hopefully the kids will have as many ideas as I do for how to play with this game and it will keep them busy for a good long while. One can hope anyway, right?
This post first appeared over on Positively Splendid as part of her holiday series. She is one of the most genuine and talented women I know- if you haven’t had a chance to see what Amy is all about, you should go check her out! 😉 I mean check her blog out.
xoxo,
Amy

