Today I am participating in a group project of sorts. I was given the opportunity to receive some kits for various wood and vinyl projects. I was asked to create my own version of the project and then link them up with other projects. This is a project that will be going on for a few weeks- but will be full of fun projects you can purchase kits for, or just make for yourself. So it’s a win/win. 🙂 I am working with
Fab Decor.com to bring you these fun projects. You can find her instructions and the full link party with other versions of this craft here at
Fablify It.com.
But, since you’re already here, I’ll give you my quick tutorial on how I made my version first. 🙂 I started with the kit, which includes 3 4X4 pieces cut to lengths of 4″, 6″ and 8″, which have been sanded as well as 3 small pieces of 2X2 as the stem. The kit also comes with 3 layered vinyl faces. If you want to do this on your own, you can just cut the 4X4 to the correct lengths and sand them down.
I wanted my pumpkins to have a very rustic feel to them, so I took a hammer and chisel and notched off the corners as well as made some cuts into each side. You can make them as deep or as shallow as you like. Sand down the notches after you’re done to make it easier to paint.
This shows the wood after notching, painting and sanding to distress the paint. I used a color called Cadmium Orange. You could leave the pumpkins like this, which is very bright and fun, but again, I wanted mine a bit more aged, so I decided to stain them. I used an antiquing medium in a mid-brown tone and wiped it on with a rag the followed quickly with a damp cloth to take most of the stain back off. I also stained the stem pieces.
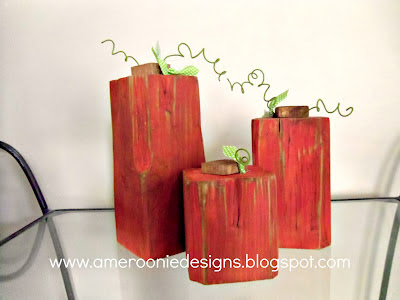
I used floral wire wrapped around a marker for the vines and strips of fabric tied to the vines for leaves. I used a small nail to create a hole on the top that I just slide the wire into, this will make it easier to store since I won’t have to worry about crushing the wire. 🙂 I used hot glue to put the stems into place.
This was a fun, quick project that I would recommend anyone try. If you’re interested in purchasing the kit, you can do so here. She also sells just the vinyl faces if that’s all you need.
Melissa is hosting a Rafflecopter giveawayso head over there and enter to win- she’s giving away finished pumpkins as well as kits- so lots of chances to win!!
I am looking forward to many more fun, fabulous projects like this over the next few weeks.
Are you ready for fall, or are you soaking up the last bit of summer vacation? We are already into the swing of school and everything, and now that I have these pumpkins made, I’m kind of ready to pull out the fall decor and change things up a bit. But, it might have to wait until I’ve had just a bit more sleep. 😉
Have a wonderful Wednesday!!
xoxo,
Amy
** I was given the unfinished wood and vinyl to create this project, but the opinions and statements are all mine.**
If you have any questions, or would like more detailed pics of the process, let me know and I’ll elaborate.

Creator, sewist and mom of 6. Making and sewing keeps me sane and happy. I'm here to share my love of creating with you. Free patterns, tips and tricks and videos to help you discover your own creative passions.


Leanne
August 30, 2012 at 2:10 pmThese are so cute! I love how you aged them.
Jess from Coxs Corner
August 31, 2012 at 12:08 amI love the way you distressed and shaped your pumpkins! They are really neat!
Lina - Fancy Frugal Life
August 31, 2012 at 2:53 amGreat project! So cute and fun 🙂
Lina
Debra
September 1, 2012 at 6:54 pmOh how I love yours! I totally accidentally used the 2x4s instead of the 4x4s, yeah I am crazy. 🙂 I love the stain!
Ewa Kelly-Miksa
September 4, 2012 at 12:37 pmwhat a great idea!
I would like to let you know about a new Craft Party,
I would love to see your creations linked up with Crafty Tuesday
Every week I will choose few tutorials and they will be featured on my blog and my facebook, twitter and pinterest page
I hope to see you link up
http://blueberrycraftandhobbytime.blogspot.ie/search/label/Crafty%20Tuesday%20Link%20Party